
Anybody who designs a website, be it a wiki or any other kind of site, will eventually come to realize that an all-text site is one of the most boring things ever, and although some of that is helped with some well-placed colors and styles, you’ll eventually need some images to spice things up.
PBwiki makes the image upload process very easy, and the basic layout options are simple. However, before we even begin the layout process, the first step to making optimum images begins well in advance. This week, we’ll take a look at how to prep your images before you upload them, and next week, we’ll discover some neat ways to present them in your wiki.
Software
PBwiki stats tell me that most PBwiki users are on Windows-based machines, so there’s really only one good option for your basic image-editing needs:
Use it. Love it. It converts practically every format into every other format, resizing/resampling and doing basic effects with ease. You can’t go wrong. For folks using a Mac, I really have no idea, so tell me if you know a good free option. Linux users can fend for themselves.
Formats
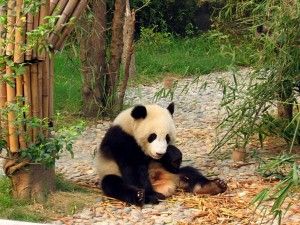
For most cases, I like to classify images into two categories: photographs (and photograph-like images) versus graphics. The basic rule of thumb here is that the first category, photos, includes anything with rich colors, and/or gradients. The second category, graphics, includes images with many solid-colored spots and a limited palette, which are often computer-generated.
To demonstrate the difference, I’d like everyone to meet Oscar the panda, first with a photo (from the Wikimedia Commons):

And now a graphic (drawn by me):

The two formats traditionally used online are JPEG (the ones that end in .jpg) and GIF (the ones that end in .gif). The JPEG standard uses a compression that optimizes for gradients and many colors, like the Oscar photo. The GIF standard uses a palette (256 color or less) and a compression scheme optimum for solid colors, like the Oscar graphic.
To again demonstrate the difference, take a look below. The image shows a detail of a rainbow from an image at the Wikimedia Commons in both formats and blown up 4x. The one on the left is from the JPEG, showing smooth, vivid colors. The right, the GIF, shows evidence of a limited color palette and definite blotchiness.

Therefore, if you’re bringing in pictures from your digital camera, make a JPEG, but if you drew a graph in Microsoft Paint, go with a GIF.
Sized to Fit
The Internet is about speed, and to get optimum speed, your graphic file sizes need to be as small as possible. You’ve already taken the first step by choosing the right kind of image, but you also need to choose proper image dimensions.
Too often, people upload giant photos to their wiki, then resize them using HTML (or by dragging the little resize bar in the Point-and-Click Editor). This does not ease your load time at all, and in many browsers, the resized image may show distortion. The example below is a large photograph that has been resized before uploading:
The full-size image, which can be accessed here, is well over 200Kb in size. That translates to as long as a full minute loading for somebody on a dial-up modem. On a high-speed connection, it’s more like a few seconds, but with ten or more images, you’d really feel the lag. Furthermore, if you’re using a free wiki, you get only 10 megabytes of space. At over 200Kb a pop, you’d be able to upload less than 50 photos to your wiki. Get that down to 40Kb, like the image above, and we’re talking 250 photos.
If you use Irfanview, you’ll be given the option to either Resize or Resample. Resampling will almost always give a better result, as it recalculates the individual pixels that make up the image, while resizing simply matches a pixel with the closest pixel from the original image.
Conclusion
Streamlining your images is a winner for everyone: it makes your visitors happy (the page loads more quickly), it makes PBwiki happy (their servers don’t get overloaded needlessly), and thus you’re happy. That just so happens to make Oscar happy too:

See everyone next week as I discuss layout options with images as well as the ever-popular thumbnail approach! As always, e-mail me at dochuyen84@gmail.com or leave a comment below!

One thought on “Tip of the Week #9: Images, Part I”