
There are a few questions I keep seeing in the forums over and over concerning the Point-and-Click editor, and I thought I’d use this space to clear up one of them today: How do I do a Table of Contents (ToC)?
I admit that the answer is not immediately clear like it is on the old Classic editor, where entering the statement “<toc>” on the page would create a table of contents linking to every header on that page created with a “!”, “!!”, or “!!!”.
The idea of the Point-and-Click editor concerning the ToC is exactly the same. Insert a Table of Contents plugin and it will create links from every first, second, and third level header you create. But sometimes you need a little illustration, so here’s everything step by step…
Creating a ToC in the P&C Editor
1. Insert the ToC plugin
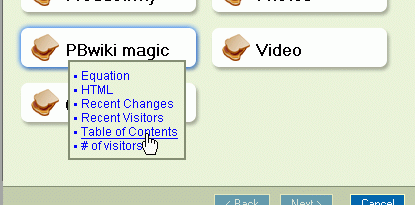
Click on the Insert Plugin button:

A window will popup, where you’ll want to click on PBwiki Magic, then Table of Contents:
The ToC only has one option, the “depth” which refers to how many levels of headers will be recognized. If left to the default of “3”, then the three largest header sizes (which in HTML will correspond to <h1>, <h2>, and <h3>) will be chosen. If “2”, then the two largest, and so forth.

Confirm it by following the instructions onscreen and you’ll be taken back to your edit window with a little object representing the inserted plugin.
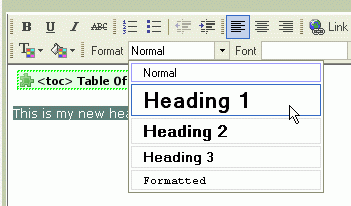
2. Create the Headings
Now we can go about creating the headings themselves. First type in the heading text you’d like, and then highlight it. Then go up to the Format option and select either Heading 1, Heading 2, or Heading 3.
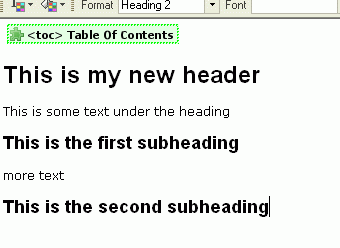
After doing this for a few rounds of text, you should have something that looks vaguely look what I have below:
That’s it!
3. The final result
Once you’ve hit Save, the final wiki page should look something like this:
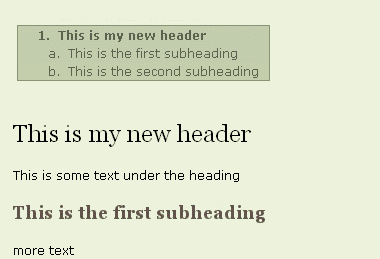
As you can see, the plugin has been replaced by a table of contents. A great feature of that ToC is that each heading can be accessed individually by clicking on the link inside the ToC, as it also creates an internal anchor for each heading. Cool huh?
Conclusion
Okay, so today was a little short, but I like having this here as a reference for anybody who has trouble creating a ToC. Next time, we’ll look at table creation and insertion in similar detail, with a special bonus on using CSS to style PBwiki tables the way you want.
Thanks to everyone for bearing with me this past week or so (getting wisdom teeth extracted is not the most exciting thing). Since last time, I’ve gotten an official PBwiki address, so everybody can now e-mail me at jason.nguyen@pbworks.com if you have comments or suggestions. Thanks!

And here I thought that the entire point of the new Point-and-Click editor was to be *easier* than the Classic Editor. Funny how you have to produce all these complicated tutorials with pictures and diagrams in order to accomplish such (formerly) simple tasks.
Please reference these blogs in the current (May 2008) help systems so beginners don’t chase endlessly through complex ‘what if’ scenarios and are never given the simple ‘How To’ instructions
Actually you need only to put the cursor anywhere in the line and then select the heading style. It functions as Styles does in MSWord. Thanks for the help!